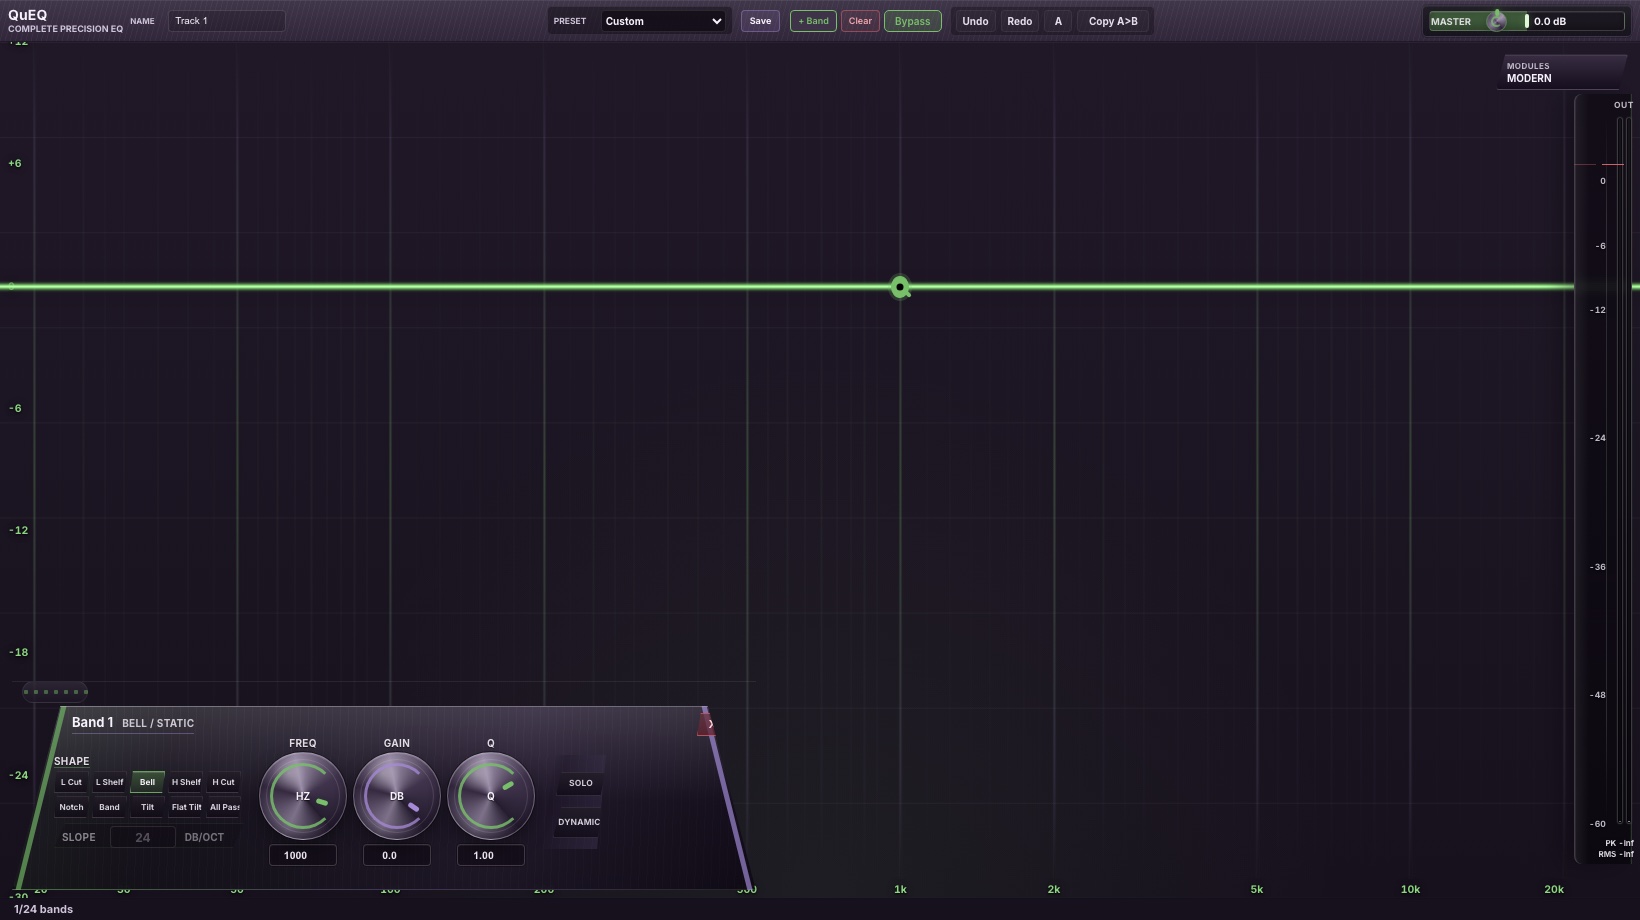
QuEQ is the QuosineDSP flagship equalizer: a 24-band precision EQ with dynamic bands, analyzer-driven editing, Relative Spectral Editing, YanQ peak control, EQ Match, stereo and format-supported immersive routing targets, multiple processing modes, output tools, presets, A/B comparison, and state-safe host automation.
This manual describes the QuEQ interface and its operating controls. It covers each visible control, direct mouse and keyboard actions, and the advanced features available without interrupting normal EQ work.
Contents
- Quick start
- Main interface map
- Graph and analyzer behavior
- Creating, selecting, and moving bands
- The trapezoid band console
- Filter shapes and cut slope
- Dynamic EQ bands
- Relative Spectral Editing and YanQ
- Analyzer module
- EQ Match module
- Routing module
- Settings and utility module
- Output meter and master output
- Presets, A/B, state, and keyboard controls
- Factory presets
- Host automation and saved sessions
- Practical workflows
- Parameter reference
1. Quick Start
Load QuEQ on a track or bus, start playback, and work directly in the graph.
Double-click the graph to add a standard bell band at the click position. Hover near the EQ curve until the suggested insertion dot appears, then click to create a band exactly on the current curve and drag it immediately. Drag a band horizontally to change frequency and vertically to change gain. Use the QQQ controls in the band console for precise frequency, gain, and Q entry.
Use the module control at the top right of the graph to open Analyzer, EQ Match, Routing, or Settings. The module boxes stay collapsed until needed so normal EQ movement remains the center of the interface.
For fast problem-frequency work, hover over the live spectrum. QuEQ freezes a usable spectral frame when your pointer is in the active spectral region. Move near a visible peak, then YanQ it: drag the peak up or down and QuEQ writes the matching relative EQ move while preserving the original peak frequency.
2. Main Interface Map
QuEQ uses a wide graph-first layout. The graph is the primary editor; the lower trapezoid appears only when a band or module needs detailed controls.
Top Bar
QuEQ title identifies the plugin and current editor. The instance name field labels the running QuEQ instance for linked-instance workflows and EQ Match source selection.
The Preset selector loads factory and saved EQ shapes. Save stores the current bands plus relevant global settings as a user preset.
- Band creates a default bell band at 1 kHz and 0 dB. Clear removes all active bands and sends every band slot back to neutral. Bypass is the main processing bypass control.
Undo and Redo step through band edits stored in the editor history. The A/B button swaps between the active buffer and the hidden comparison buffer. Copy A>B or Copy B>A copies the current buffer into the other comparison slot.
The Master control at the top right is the global output gain fader. It contains the horizontal fill, the mini Q knob, and the current dB value in one control.
Graph Area
The graph shows the EQ curve, the frequency grid, dB labels, optional piano note labels, analyzer layers, dynamic-band ghost areas, band nodes, and the right-side output meter.
The frequency axis is logarithmic from 20 Hz to 20 kHz. The dB axis follows the selected display scale. The right-side meter is separated from the EQ dB scale because it measures output level, not EQ boost/cut.
Module Launcher
The small module box in the upper-right graph area opens the four global modules: Analyzer, EQ Match, Routing, and Settings. It collapses back into one control so advanced options are available without permanently occupying graph space.
3. Graph and Analyzer Behavior
QuEQ calculates its analyzer display from the plugin audio stream. It can display the processed spectrum, pre/post comparison, or collision-oriented monitoring depending on the selected analyzer source.
The analyzer range is normalized for visual use with a floor around -70 dB. The output meter has its own scale from -60 dB to +6 dB. These are intentionally separate visual domains.
The graph includes:
- EQ curve: the actual combined response of enabled bands.
- Band nodes: draggable handles for each active band.
- Analyzer layer: real-time or frozen spectral magnitude display.
- Frozen spectral frame: a temporary spectrum reference used for YanQ edits.
- Dynamic ghost area: a visual highlight showing the area a dynamic band may move through.
- Frequency labels: 20, 30, 50, 100, 200, 500, 1k, 2k, 5k, 10k, and 20k.
- Output meter: peak and RMS readout on the far right.
4. Creating, Selecting, and Moving Bands
Add a Band
Double-click anywhere in the graph to add a bell band at that frequency and gain.
Hover near the EQ curve to reveal a suggested insertion dot. Click that dot to create a band on the curve and immediately drag it. This prevents accidental bands from ordinary single-clicks in empty graph space.
- Band creates a neutral bell band at 1 kHz.
Select and Move
Click a band node to select it. Drag the node left or right to change frequency. Drag up or down to change gain. Hold Shift while clicking nodes to build a multi-band selection.
When a graph edit begins, the detailed control surface is designed to stay out of the way so the graph remains visible. When the edit ends, the band console returns for precise adjustment.
Right-Click Band Menu
Right-click a band node to open the compact in-plugin band menu. The menu lets you change shape, choose Static/Dynamic/Focused mode, choose channel target, and delete the band without going into a separate settings screen.
Direct Keyboard Control
With a band selected:
- Arrow Up / Arrow Down changes gain by 0.1 dB.
- Shift + Arrow Up / Down changes gain by 1.0 dB.
- Arrow Left / Arrow Right changes frequency by 1 Hz.
- Shift + Arrow Left / Right changes frequency by 10 Hz.
- Tab cycles through active bands.
- Delete or Backspace removes the selected band.
- Command-Z or Control-Z performs Undo.
- Command-Shift-Z or Control-Shift-Z performs Redo.
- Command-C copies the selected band settings.
- Command-V pastes copied band settings onto the selected band.
- F11 toggles fullscreen when supported by the host surface.
5. The Trapezoid Band Console
Selecting a band opens the trapezoid band console. This console is intentionally shaped and organized around the most important work: shape on the left, QQQ controls centered, and band state/dynamic controls on the right edge.
The header shows the band number, filter shape, and whether the band is Static or Dynamic.
The X button at the top-right corner of the trapezoid deletes the selected band.
The right edge controls contain Solo and Dynamic. Solo temporarily focuses audition and curve drawing on the selected band. Dynamic enables or disables dynamic behavior for that band.
The center QQQ controls are:
- Freq: band frequency. Drag the knob or type a value in the value field.
- Gain: band gain in dB. Drag the knob or type a value.
- Q: bandwidth/resonance control. Higher Q is narrower. Drag the knob or type a value.
The QQQ value fields are direct numeric entry controls, so exact values can be typed instead of approximated by dragging.
6. Filter Shapes and Cut Slope
Every band can be assigned its own filter shape. The shape selector is a button grid, not a buried dropdown.
Available shapes:
- Low Cut
- Low Shelf
- Bell
- High Shelf
- High Cut
- Notch
- Band Pass
- Tilt Shelf
- Flat Tilt
- All Pass
Low Cut and High Cut expose the Slope field. Slope is typed directly or adjusted by dragging the value field up/down. It ranges from 6 dB/oct to 192 dB/oct. 192 dB/oct is the Brickwall endpoint.
The slope field is inactive for shapes where slope is not musically relevant.
7. Dynamic EQ Bands
Any band can be static or dynamic. Dynamic mode lets the band respond to signal level instead of applying a fixed gain change at all times.
Dynamic controls:
- THR: threshold. The signal level at which dynamic action begins.
- RNG: dynamic range. Negative values reduce when triggered; positive values boost when triggered.
- ATK: attack time. Lower values react faster.
- REL: release time. Higher values return more slowly.
- DET: detector source. INT uses the internal band signal. SC uses sidechain detection where the format and host support it.
Focused mode is a shortcut for narrow-Q dynamic control. It is intended for resonances, harshness, ringing, nasal buildup, or other problem frequencies that need targeted movement rather than broad tone shaping.
Dynamic bands show a ghost highlight around the response area so you can see the possible movement range in context.
8. Relative Spectral Editing and YanQ
QuEQ’s branded spectral edit action is YanQ. The full feature name is Relative Spectral Editing.
Hover over the live spectrum to freeze a useful spectral frame. Move near a peak until the spectral edit point appears. Drag the peak up or down to YanQ it.
YanQ does not jump a band to the click point. It preserves the peak frequency and writes an EQ move equal to the vertical spectral change you perform. If you pull a peak down by a certain amount, the created EQ move reflects that relative cut. If you push a region up, the created EQ move reflects that relative lift.
This is useful because problem frequencies are often easiest to identify visually on the spectrum, but the actual EQ adjustment must remain mathematically tied to the edit you made. YanQ is designed for that: quick hover, freeze, drag, and exact relative response change.
Manual fallback: Command-click or Control-click in the spectrum area starts the relative spectral edit workflow from a resolved visible peak when the hover candidate is not already active.
9. Analyzer Module
Open Analyzer from the module launcher.
Controls:
- Analyzer On/Off: enables or disables analyzer drawing.
- Source: Post Live, Pre + Post, or Collision Live.
- Speed: Fast, Medium, Slow, or Frozen.
- Res: Low, Medium, High, or Ultra.
Post Live shows the processed signal. Pre + Post shows input/output comparison where telemetry is available. Collision Live is intended for conflict-aware monitoring and linked-instance workflows.
Frozen speed holds the analyzer frame for careful inspection. YanQ also uses a temporary frozen frame while hovering over editable spectrum material.
10. EQ Match Module
Open EQ Match from the module launcher.
Controls:
- Smart Assess: evaluates the current spectral situation and builds a correction plan.
- Match Src: Captured Ref, Pink Target, or Instance.
- Capture Ref: stores the current spectrum as the reference.
- Run Match: computes and applies the match plan.
- Instances/List: opens the linked instance list when other QuEQ instances are broadcasting.
Captured Ref compares against a captured reference frame. Pink Target compares against a pink-style tonal target. Instance uses a linked QuEQ instance as the comparison source when available.
EQ Match should be used as a starting correction tool. After matching, audition the result and refine with normal bands or YanQ.
11. Routing Module
Open Routing from the module launcher.
Global channel modes:
- Stereo
- Mono
- Mid/Side
- Surround, when the VST3 host exposes a supported immersive bus layout
Stereo targets include ST, L, and R. Mid/Side targets include MID and SIDE. Mono uses summed mono behavior.
VST3 immersive layouts include 5.1, 7.1.4, and 9.1.6 in hosts that expose those bus configurations. Targets include center, LFE, front, rear, and height groups. The visual surround map lets you choose the target field without reading a long list. Other plugin formats expose only the channel layouts separately verified for that format and host.
Per-band routing can also be adjusted from the selected-band console. This is how one band can target a specific channel or field while the rest of the EQ remains normal.
12. Settings and Utility Module
Open Settings from the module launcher.
View controls:
- Piano: shows or hides piano-note frequency markers.
- Full: toggles fullscreen mode where supported.
- Display scale: cycles the graph dB display range, such as +12/-30, +6/-18, or +18/-30.
Edit control:
- Sketch: lets you draw a general EQ curve gesture in the graph. QuEQ converts the gesture into a small set of useful band moves.
Character controls:
- Clean: neutral character mode.
- Subtle: controlled nonlinearity for light tone.
- Warm: warmer character mode for more coloration.
Processing controls:
- Zero: default low-latency precision mode.
- Natural: mode-specific coefficient behavior intended for a natural response.
- Linear: linear-phase processing with reported latency where supported.
Output controls:
- OUT: global output gain.
- SCALE: gain scale multiplier.
- AUTO: auto-gain amount.
- POLARITY: normal or inverted phase.
State controls:
- A/B: switches the comparison buffer.
- Copy: copies the current buffer into the other A/B slot.
- Export: exports the current QuEQ state.
- Paste: imports a compatible QuEQ state.
Theme control:
- Modern/Vintage toggles the interface theme.
13. Output Meter and Master Output
The far-right meter measures output level. It displays Peak and RMS values with an independent meter scale. This is not the same as the EQ gain scale shown on the graph.
The meter marks 0, -6, -12, -24, -36, -48, and -60 dB. Hot output is visually emphasized when peak level approaches 0 dB.
The Master output control adjusts the global output gain from -30 dB to +30 dB. The control contains the label, fill, mini Q knob, and exact dB value in one horizontal fader.
Use Master output to compensate for broad EQ gain changes or to trim the output before the next plugin in the chain.
14. Presets, A/B, State, and Automation
The preset system stores bands and global settings. Factory presets are included for common starting points. Saved presets are stored locally by the editor surface.
A/B comparison is separate from Undo/Redo. Use A/B when you want to compare two intentional states. Use Undo/Redo when you want to step backward or forward through edits.
Export/Paste moves QuEQ state between sessions or instances where supported. Saved sessions recall EQ bands, dynamic settings, routing targets, and output settings. Licensing is resolved independently and does not rewrite the DSP state stored in a DAW project.
Host automation exposes the band and global parameters through the plugin format surface. Automation should be used for intentional production movement, not as a replacement for checking gain staging and phase behavior.
15. Factory Presets
Current editor presets:
- Cleanup Start: basic corrective starting point.
- Vocal Presence: vocal cleanup and presence with dynamic top control.
- Mix Bus Polish: broad tonal shaping for mix bus work.
- Resonance Control: narrow dynamic cuts for problem peaks.
- Mastering Linear: mastering-oriented linear-phase starting point.
Additional factory presets:
- Precision Vocal Cut: narrow vocal resonance control.
- Drum Bus Punch: drum bus body and transient focus.
- Low End Tighten: bass and low-mid cleanup.
- Master Tilt Cleanup: broad mastering balance.
- Master Air Control: high-end polish with dynamic restraint.
- Master Harshness Tamer: dynamic harshness reduction.
Factory presets are starting points. They are not automatic mix decisions. Always adjust frequency, gain, Q, dynamics, routing, and output for the source material.
16. Practical Workflows
Remove a Resonance Quickly
Play the problem section. Open Analyzer if needed. Hover over the active spectrum until the frame catches the peak. YanQ the peak downward. Fine-tune the created band with QQQ. Enable Dynamic if the resonance only appears on certain notes.
Shape a Vocal
Start with Vocal Presence or a clean custom state. Use a Low Cut to remove sub-rumble. Use a Bell or Dynamic Bell for low-mid buildup. Use a narrow Dynamic band for harsh consonants. Add a small High Shelf only after controlling harshness.
Clean a Mix Bus
Use small moves. Consider Natural or Linear mode depending on the material and host latency tolerance. Use Pre + Post analyzer to confirm that broad EQ moves are doing what you intend. Use Master output to keep level comparisons fair.
Work in Mid/Side
Open Routing and choose Mid/Side. Select MID for center energy such as vocal body or kick weight. Select SIDE for width, ambience, or stereo harshness. Keep moves modest and check mono compatibility.
Work in Surround
In a supported VST3 immersive host, open Routing and choose Surround. Select 5.1, 7.1.4, or 9.1.6, then use the surround map to target center, LFE, front, rear, or height regions. For per-band decisions, open a band and set its channel mode and target inside the band console. Do not assume the same layout is available in another plugin format unless that host presents and accepts it.
17. Parameter Reference
Per band:
- Frequency: 10 Hz to 30 kHz in the DSP layer; the graph covers the audible 20 Hz to 20 kHz editing range.
- Gain: -30 dB to +30 dB.
- Q: 0.025 to 40 in the DSP layer; the UI QQQ control focuses practical editing from 0.1 to 40.
- Dynamic threshold: controlled by THR.
- Dynamic range: shown as RNG and mapped to the dynamic ratio behavior.
- Dynamic attack: 0.05 ms to 100 ms.
- Dynamic release: 1 ms to 500 ms.
- Dynamic detector: internal or sidechain.
- Target: full/stereo, mono, left, right, mid, side, center, LFE, front, rear, or height depending on mode.
- Type: Bell, Low Shelf, High Shelf, Low Cut, High Cut, Notch, Band Pass, Tilt Shelf, All Pass, or Flat Tilt.
- Slope: 6 dB/oct to 192 dB/oct for Low Cut and High Cut.
Global:
- Output gain: -30 dB to +30 dB.
- Phase invert: normal or inverted.
- Auto gain: 0% to 100%.
- Gain scale: 0.25x to 2.0x.
- Character mode: Clean, Subtle, or Warm.
- Processing mode: Zero, Natural, or Linear.
18. Notes on Precision
QuEQ’s graph and analyzer exist to support sonic decisions. The analyzer should help identify what is happening, but the final decision should always be made by listening in context. YanQ, EQ Match, dynamic bands, and surround targeting are tools for reducing friction; they do not replace gain staging, monitoring, arrangement judgment, or careful A/B checks.
For precise edits, prefer small moves, compare level-matched output, and verify the result in the full mix.